Easy to Make Coconut Gizzada, a Delicious Homemade Treat

Sweet Coconut Gizzada Pastry

Here we go again with another easy to make sweet coconut treat. This time I’ll be sharing how to make this simple, yet scrumptious dessert that can be enjoyed on any occasion.

Speaking of occasion, now that the holidays are approaching fast, the coconut gizzada is a great addition to your traditional holiday dishes. With just a few ingredients and some easy to follow steps, you too can master the art of making your own coconut gizzada dessert.

Yummy Old Time Jamaican Gizzada treat
Flaky Gizzada Crust/Juicy Filling

The coconut gizzada consists of the outer shell/crust and coconut filling. Although this is a simple recipe, there are a few tips and tricks I use to make my coconut gizzada a bit more unique.

What you’ll need for the filling:

  • 2 cups grated or flaked coconut
  • 1 cup brown sugar (less sugar if you’re diabetic)
  • A pinch of salt
  • Vanilla
  • Grated nutmeg
  • Cinnamon powder
  • Grated ginger (optional)

What you’ll need for the crust:

  • 2 cups all-purpose flour
  • 1 stick butter (equals to 1/2 cup)
  • 1 egg yolk (optional)
  • A pinch of salt
  • Cinnamon (optional)
  • Ice water

Mix all the ingredients for the filling into a bowl, cover it, and leave it for at least 30 minutes. This way the spices will soak thoroughly into the grated coconut.

making coconut filling dry
Coconut Filling Ready for Gizzada Crust

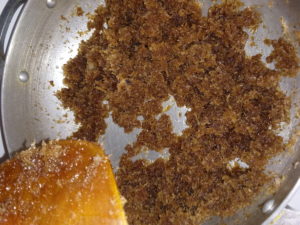
After soaking, add 1 1/2 cup of water, stir and let it boil down completely. Make sure that all the liquid is gone with just enough to keep the filling together.

butter dough mixture
Dry Mixture for Coconut Gizzada Crust

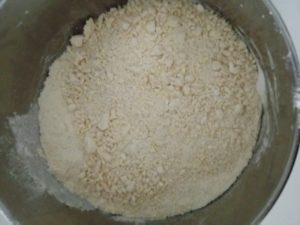
Now for the dough. Make sure that your butter is cold, straight from the fridge. Cut small slices of butter and add it to the flour. Use your fingertips and work the butter into the flour. Add the egg yolk and stir it into the flour. The egg yolk and butter will make a more crunchy, flaky gizzada crust rather than a chewy crust.

Use ice water to make your dough and make sure not to knead the dough. You just need to get all the mixture combined together into a ball. Then wrap it securely with a piece of plastic wrap and place it in the fridge for at least 30 minutes.

Once the dough is taken from the refrigerator, lightly flour the surface that you will be using. Cut the dough in pieces that would estimate the size of each shell. Use a rolling pin to roll out the dough into a circle. You may use a circular shaped kitchenware to get a perfect circle or a pastry cutter.

Making gizzada shell from scratch
Homemade Gizzada Crust

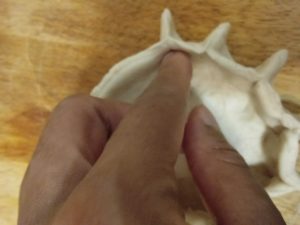
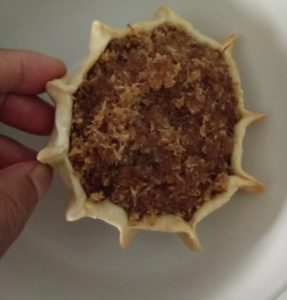
Take the circular dough and pinch the corners. The best way to do this is to put your index finger on the inner location that you’re about to pinch then use your other thumb and index finger to pinch that area. Leave about 1/2 between each pinch and continue that pattern until your shell look similar to the ones in the photo below.

I like to pre-bake my gizzada crust for about 5-10 minutes to help them hold their shape. Grease the baking tray to prevent your gizzada crust from sticking to it.

dough for coconut gizzada
Prebaked Gizzada Crust

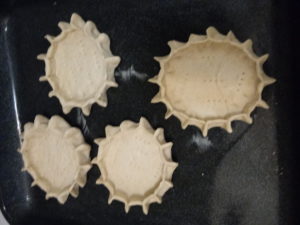
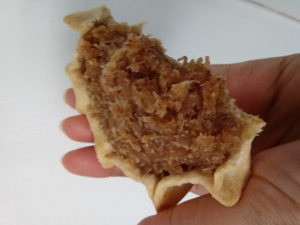
After pre-baking the gizzada shells, use a spoon to put the coconut filling into each shell. Place them back in the oven and bake for another 10 or so minutes.

Tip of the day:

A quick gizzada tip is to use a fork to stick the shells so the inside of the shells  stay flat while baking.


Peanut Irish Moss Punch: A Tasty Homemade Natural Drink Treat

Irish MossIrish moss drink is simply smooth and delicious, if you make it the right way. Today I’m going to share with you, how to quickly make your own natural, nutritious Irish moss drink with a hint of peanut. You will love this one, and want to make it over and over again.

Peanut Irish Moss DrinkThis peanut Irish moss drink is one of my favorites. It turned out perfectly, not too thick, and not too thin. If you’re allergic to peanuts, you can leave that part out and still make a delicious, rich drink.

Things You’ll Need

  • 3 oz Raw Irish Moss/Sea Moss
  • 1.5 oz linseed/flaxseed
  • Isinglass
  • Water
  • Condensed milk
  • Spices (cinnamon, nutmeg,vanilla)
  • 2-4 tbsp Peanut butter
  • Rum (optional)
  • Whisk
  • Strainer
  • Container

Preparation for Boiling Irish Moss

You must wash your raw Irish moss thoroughly. You may need to soak it overnight to remove the sand and other debris. Put about a gallon of water in a pot with your Irish moss, linseed, Isinglass, and cinnamon bark.

Boil on medium heat until all the Irish moss is completely dissolved. You may have to crack open your pot cover a little, since the liquid tends to sometimes boil over in the stove if the pot is completely closed.

Allow the Irish moss to cool. After it’s cooled, you have to strain the liquid from the pot to another container. This may take some time, since the liquid may be a bit thick. To make the process quicker, use a spoon to stir the liquid inside the strainer, helping it to drain faster.

Mixing Your Peanut Irish Moss Punch

Sweeten your boiled Irish moss with condensed milk. You can add honey or sugar to help sweeten it. Add nutmeg, vanilla, peanut butter, and a tbsp of rum (optional) to the mixture.

Mix all your ingredients briskly with a whisk. Do this until the peanut is mixed in smoothly with the rest of the liquid. The drink will start to look smooth and creamy. To give it  an even more smoother texture, you can use a blender.

Pour your Irish moss peanut punch in your containers and placed in the refrigerator to chill. Now, there you have it! Enjoy this special treat with your family, friends, or just by yourself.


Learn How to Make Natural Organic Coconut Oil

Dried Coconut

Coconut oil is known to have a huge amount of health benefits. The oil is beneficial to the skin, hair, heart, including a lot more health benefits not mentioned here. Coconut also has a delightful taste when used in dishes or for baking a wide selection of pastries. If you look in the beauty section of the stores you will notice that there are many beauty products that have coconut as one of the main ingredients. If you don’t feel comfortable purchasing coconut oil or if you want to make sure that you are using 100% natural organic coconut oil, you may consider making your own from scratch. It’s pretty straight forward, as long as you follow the directions correctly. You are just minutes away from making your own natural coconut oil right in your home.

Preparing the Coconut

Purchase three or four dried coconuts from the produce section in the supermarket. Gather all the things that you will need to prepare your organic coconut oil. The ingredients will be limited to only coconut and water, as you are making 100% natural oil.

Things You Will Need:

  • Coconuts
  • Safety Glasses
  • Hammer
  • Strainer
  • Cup
  • Containers
  •  Knife
  • Blender
  • Water
  • Pot
  • Jar

Coconut Oil Recipe

1. Put on your safety glasses to protect your eyes from any flying debris, such as coconut shell.

2. Break each coconut with the hammer.

Broken Dried Coconut


3. Pour the coconut water through a strainer, and into a cup.

4. Use the knife to carefully loosen the coconut from the shell. Sometimes you may need to break the shell into smaller pieces to make it easier to remove the coconut.

5. Wash all the coconut in a container to remove small pieces of shell and other debris.

6. Thoroughly drain the water from the container. Slice the coconuts into strips. The pieces should measure 1/2 inch in width and 1 inch in length. Continue to cut strips of coconut until all the coconuts are sliced.

Sliced Coconuts


7. Place two cups of sliced coconut into the blender and add three cups of warm water (the warm water helps to extract the milk from the blended coconut) to it. Blend at high speed using the “Grate” button. Blend for at least 2 to 3 minutes.

8. Pour the blended coconut from the blender into a container. Keep adding two cups of sliced coconut each time, along with three cups of water, until all the coconut is blended.

9. Place a pot beside the one that has the blended coconut, then put a strainer across the top.

10. Grab a handful of coconut and squeeze out the coconut milk (the milk should be going into the same container with the blended coconut). To get more milk out of the shredded coconut, put a few handfuls of the blended coconut into a clean cheese cloth, then twist it (while holding the top of the cloth) to squeeze out the milk.

11. Place the juice-less pieces aside in a separate container. Follow the same direction as above (squeezing out handfuls of coconut milk) until there are no more blended pieces to take out.

12. Pour the coconut juice into the strainer slowly, and let it drain into the empty pot.

13. Cover the pot that has the coconut milk, then put it on the stove. Turn on the stove and put it on medium.

14. Let the coconut juice boil all the way down until you start to see oil and “custard” at the bottom. It may take more than an hour to reach to this stage. At this point you should remove the pot cover. Continue to boil down the oil without the cover on the pot. Removing the cover will prevent extra moisture as a result of the steam.

15. Boil the juice down until the custard at the bottom starts to become brown.You will start to hear a frying sound and the oil will begin to rise on top of the custard.

16. Pour the oil into a clean, dry pot. Make it cool thoroughly, then pour your natural organic coconut oil into a jar. Cover the jar and keep it in a cool area.When coconut oil is cool, it becomes crystallized or solid.

Tips

Always place your hands on the cover of the blender while in use, to prevent spills.

Add coconut custard to dishes to create an island taste.

Don’t forget to enjoy the refreshing coconut water that you previously poured into your cup.

Update May 28th, 2013

Recommended Brands of Coconut Oil

Now that you know how to make coconut oil at home, here are some updates on the great benefits that you can get from using coconut oil. It is known to naturally cure: skin problems, high cholesterol, weight issues, dull or lifeless hair, including many more. There have been a lot of excitement about using coconut oil on the skin to get rid of keratosis pilaris, also known as “chicken skin.”

Nature's Way Coconut Oil

Many people have tried different things to get rid of this unpleasant skin condition, then suddenly decided to use coconut oil to treat it. It is known to smooth rough, dry skin and keep the skin moisturized throughout the day. It even helped some people to get rid of stubborn acne on different areas of the body. Here is a product called Nature’s Way Organic, Extra Virgin coconut oil, which is getting a lot of favorable reviews from many people who used it. It has many uses ranging from cooking to keeping your skin healthy.

Barlean’s Organic Coconut Oil is another recommended coconut oil that you may want to try also. Nourish your body, hair and skin the natural way. It’s amazing to know how many health benefits you can enjoy, when you add this miracle oil to your diet and your daily beauty regimen. Unlike some coconut oil that has a rancid smell, these are some of the highest quality around. Start enjoying the many benefits today.